Finally have time to write this post =DDD
bought the MG strike Freedom last 2 weeks ago. my hands are itching for a gunpla model so i went and bought one with my first salary this year.
well, bought it after some consideration and some research on some reviews which can be found here
and from here
actually considered destiny gundam extreme burst mode, but there is a waiting list of 3-4 months. T.T i don't and can't to wait that long.
without further ado, let see my first MG kit, strike freedom
p/s: here are some sites that give good guides on gunpla building
plamoadiction also have some gundam reviews and sinajus.
Tools needed: Cutter, Scissors, penknife, 0.3mm lining pencil, super fine black, blue, red gold marker, nail clippers, and sandpaper(fine)
why nail clippers, you may ask. well it is kinda like a 2 in 1 package, you can cut away nubs leftover from first cutting and you can file it using the nail file and then with sandpaper if it isn't satisfactory. and some cotton sticks(for pressing the dry transfer decals) and a pair of tweezers too.(to hold small parts when sanding and for applying stickers and decals without your fingerprint smudges at the back ruining the sticking)
 the box art(like the full blast edition though >.<)
 runners about 15++ piece
 gold polycaps, talk about bling gundam!
 the cockpit can be opened using a "sliding" mechanism but actually just an extension arm only
cool head

 inner leg frame, you can choose to paint it with gold colour if you have time and money to do so
completed leg

waist unit
 rail cannons
the cheek vents are seperated parts which means you wont need to paint it. save time!
it seems, u need to line nearly everything on the inner frame, cause idk which part will be visible after the outer frame is put on. for gold, you can use black, while for the white, you can use the 0.3mm pencil, which gives you lining and silvery finishes. if you want to create like deeper lining for shadow effect, repeat lining several times on the same area until they are dark greyish silver
 IT GLOWS!!!! no la, super strong flash nia..

ah, so pearly white( like white, very pure)
 dramatic effect(look at the shadow behind)
nub marks everywhere. T.T
 attach the wing to the main body(broke the right wing mechanism, now it abit handicap when opening, cause need to manually flip each wing)
 the back, as you can see, magnificent engineering enable the rail cannons to slide to the back and the guns can be stored at the side


argh... if i bought strike freedom full blast mode, i can have dragoons flying around then. ish..
 the shoulder dry transfer decals, the right shoulder was a failed first attempt at doing dry decals, manage to salvage abit. the left one is better


double cannon together, interesting piece of engineering, i like it! =D
can even see my double o raiser at the back
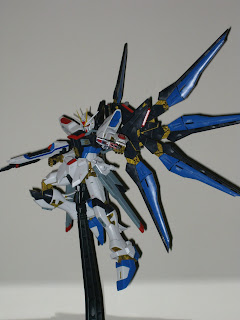 the current posing.
 the current posing.
overall,the model is very good(thank you beecraft team!!), i make some mistakes which only noobs can make(nub marks here and there) i didnt paint the model though, just apply a gloss coat(actually it is wax, which isn't paint, so it wont corrode the plastics, so if you are not satisfied with the results, take a clean cloth and wipe away the wax coat and reapply again)
if you are interested in gunpla, and looking for an MG to start with, you can consider this.
2 comments:
Hello, Just bloghopping. Great blog!
Be Well :)
Post a Comment